1. First boot
- Connect all cables to your Raspberry Pi
Keyboard, Mouse, and monitor*
*Note, monitor requires an HDMI-Mini connection, you should have a supplied HDMI-Mini to HDMI adapter - Connect power to the Raspberry Pi via USB-C power adapter (note, the Pi should automatically turn on)
- Allow the Raspberry Pi to run through its initial setup (can take a few minutes)
2. Initial setup

Here you’ll just go through the initial setup, what country you’re in, timezone, and wifi connection there are a few things to keep an eye out for which we’ll go over as we continue along.
- Set Country – United States, American English, Chicago Timezone, check both boxes that state “Use English Language” and “Use US keyboard”
- Change Password – default password is ‘raspberry,’ you can use this default password at first but we recommend you change it to something you will remember. PLEASE REMEMBER to not lose the password when you change it.
- Wifi setup – a 5ghz connection is preferred, otherwise any wifi is fine.
*NOTE: If your school requires you to log in to register a new device, you’ll need to do that now. - Update software – Skip this for now, if you didn’t skip it it’s no problem; but we will update everything anyway here soon.
- Restart the Raspberry Pi when you’re finished
*NOTE: The Raspberry Pi does not have an on/off button or a reset button! It is recommended you go to the start menu, shut down the Raspberry Pi, and unplug it when you are finished for the day.
3a. Updating the Operating System
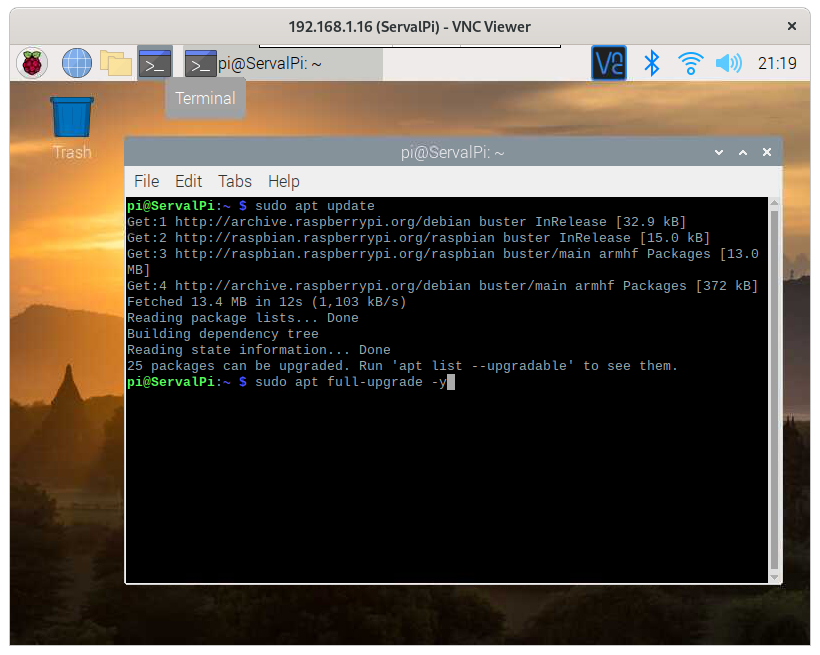
- On the top left of your screen, you will see a black box and blue bar with >_ inside, this should be the terminal button. Click it to open the terminal.
- Type the following into the terminal:
sudo apt updatesudo apt full-upgrade -y
*If update or upgrade fails, give it 5 minutes and try again, also check your network connection* - This will update the system and any packages you have installed, this is something you will need to do frequently as you install new programs, and to keep the Raspberry Pi up to date.
3b. Updating the Operating System (Additional Information, no we won’t test you on this)
- sudo is a command that states “Super User DO,” with this command you are telling Linux you want to perform an action that requires elevated privileges (aka admin abilities).
- apt (short for Advanced Package Tool) is a command which allows for the installation and removal of software on Debian-based systems such as this one.
- update only updates the package list with the latest available versions
- full-upgrade -y upgrades and installs the latest versions of packages that are already installed. The -y command auto-fills yes which simply allows you to skip typing yes every time it asks “are you sure you want to install this?”
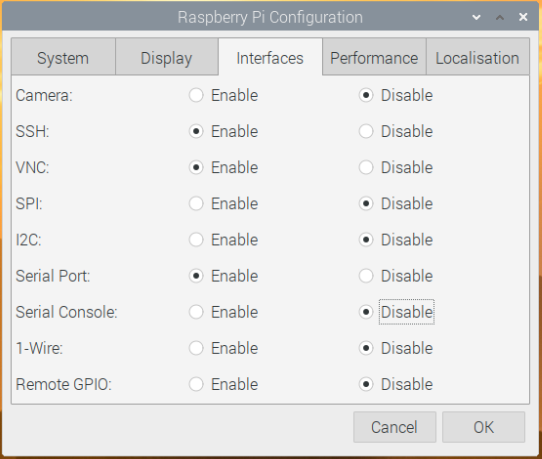
4. Basic Configurations

- Click the Raspberry on the top left corner of the screen and go to
Preferences > Raspberry Pi Configuration - System – Set your Hostname to whatever you want, and change your password here as you need
- Display – N/A
- Interfaces – Enable SSH, VNC, and Serial Port + disable Serial Console
- Performance – N/A
- Localisation – N/A
5. Screen Configurations (optional)
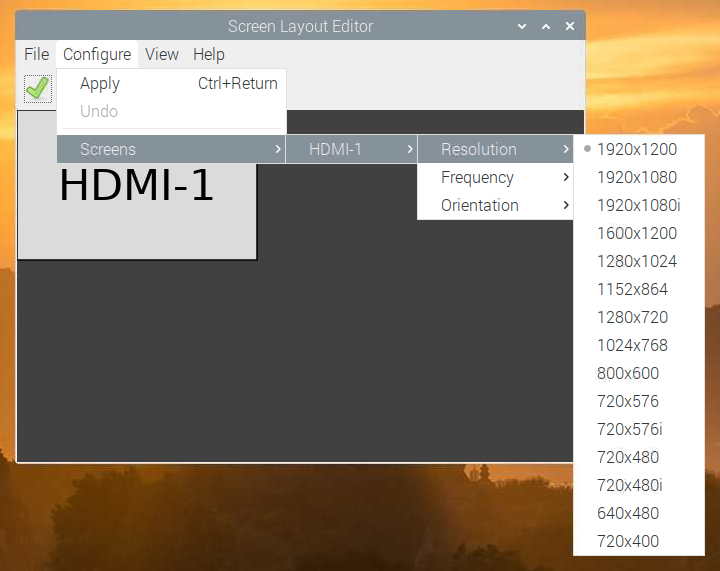
- Click the Raspberry on the top left corner of the screen and go to
Preferences > Screen Configuration - On the top bar go to the following to set your screen resolution
Configure > Screens > HDMI-1 > Resolution > *Choose your resolution* - Go back into configure and press Apply to set the resolution, and press okay when you find a reasonable resolution*
*A reasonable resolution means “This is all we got, muscle up buttercup and let’s keep on moving”
6. We’re done here! Move onto the next section when you’re ready.
YouTube Walk-through: https://youtu.be/FMpyX0u17Xs
Next Section: Raspberry Pi – Remote access
Return to main: Raspberry Pi – Introduction and how to’s